DNI electrónico (dnie) + Mac + Chrome

Antes que nada, si vas con prisas te recomiendo que enchufes tu lector de DNI con un sistema Windows (te puedes ahorrar muchos dolores de cabeza!).

Si por lo contrario eres tan tozudo como yo, aquí te pongo un poco en contexto sobre mi caso:

  • Ya había conseguido hacer login con mi Mac y Firefox sin salir de casa con mi lector de DNI siguiendo estas instrucciones.
  • Necesitaba usar el software Autofirma que en Mac solamente fuciona en Chrome ya que en posteriores versiones de Firefox el soporte para Java hacía que no funcionase.
  • Por un lado, podía leer el DNI y entrar a ciertos servicios con Firefox, pero a la hora de adjuntar y firmar documentos (con el programa Autofirma) el Firefox no funcionaba (sólamente Chrome).
  • La solución que aquí te planteo implica obtener el certificado FNMT de Persona Física, así que tendrás que personarte físicamente para que te manden el certificado personal.
  1. Solicitud del Certificado de Persona física desde Mac y Firefox aquí (Chrome no es un navegador soportado y la página se quejará de ello si intentas hacerlo con Chrome). Aunque recordemos que el objetivo final de este tutorial es ser capaz de hacerlo todo a través de Chrome y Mac.
    1. Recibirás un e-mail con un código de solicitud.
    2. Debes presentarte con tu DNI a cualquiera de las Oficinas de Registro Autorizadas. En mi caso me daba mucha pereza salir, pero intentarlo hacerlo todo desde casa supuso muchas horas de frustración con el Mac sin obtener resultados. Finalmente la oficina más cercana resultó estar a 2 minutos de casa, no había cola y en 5 minutos ya lo tenía resuelto.
  2. Habrás recibido un e-mail para descargar el certificado, sin embargo, para descargarlo tienes que hacerlo desde Firefox. Sigue las instrucciones.
  3. Hasta ahora se ha instalado tu certificado en el navegador Firefox, ahora deberás exportarlo para poder transferirlo a tu llavero y que Chrome lo pueda usar.
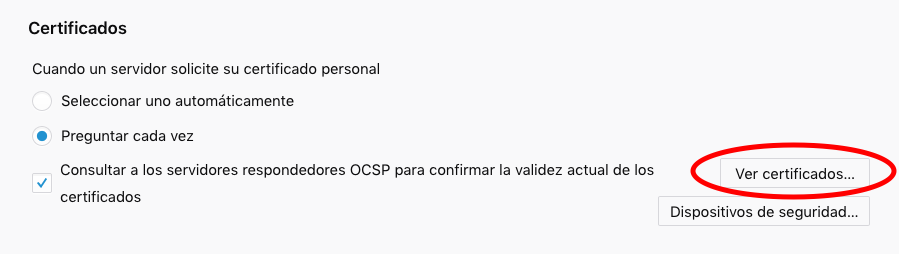
    1. Para ello debes ir a Firefox -> Preferencias -> Privacidad & Seguridad y darle a Ver Certificados
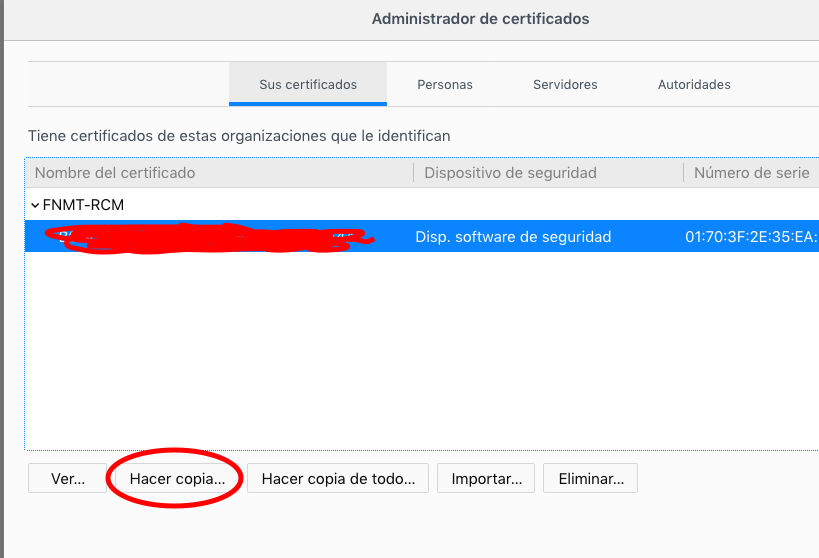
    2. Seleccionar el certificado y click en “Hacer copia”, guardar el ficher con la extensión “.p12”
    3. Por fin nos podemos olvidar del navegador Firefox. Chrome en Mac funciona con el llavero. Finder -> Ir -> Utilidades -> Acceso a Llaveros.
    4. En el llavero hay que ir a la pestaña “Login”, categoría “Mis certificados”.
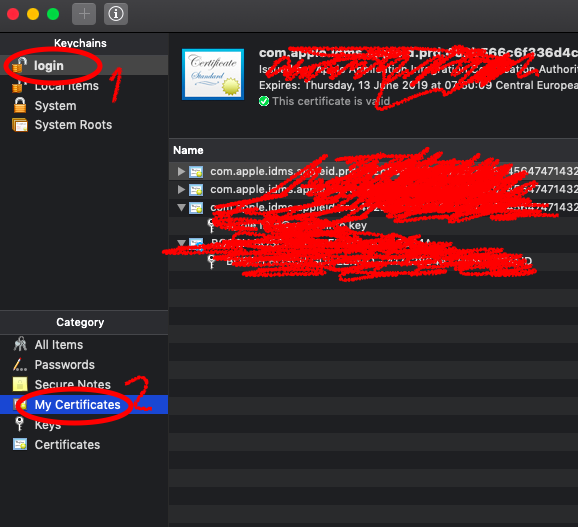
    5. Después en el mismo llavero: “Archivo” -> “Importar items”. Seleccionas el certificado que acabas de exportar.
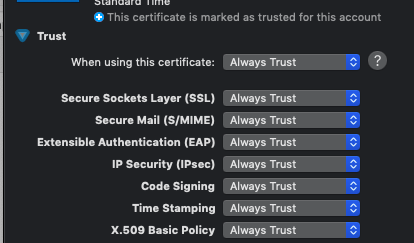
    6. Doble click en el certificado y añadir “Permitir Siempre”

Ya está, una vez intentes acceder a la sede con el DNI en Chrome y Mac, el navegador debería reconocer tu certificado. Nota: puede que necesites otros certificados si no los tienes ya instalados, incluso puede que el navegador te pida permiso para confiar en ellos, pero esto queda fuera del alcance de este mini-tutorial.

De todas formas, si tienes alguna duda, escríbeme un mensaje. Créeme, sé cuánta frustración uno puede llegar a experimentar con estos temas, así que intentaré ayudarte encantado! :)

Delete “dead” files (links) in iTunes library

Problem: some songs appear marked with the ‘!’ sign in my iTunes and I just want to get rid of them (in my case I know the original source was an external drive I’m not using anymore).

Ideas: I learned that /Users/username/Music/iTunes/iTunes Music Library.xml contains a list with all songs and their path, so eager to make it quick I planned to create a python script to modify this file till I realized there was  no need to program.

Solution:

  • everything here is related to iTunes v 11.x  & on Mac OS
  1. If running, stop iTunes and reopen it pressing Option key (alt)
  2. A prompt will ask you to change iTunes library (if not you weren’t holding the right key)
  3. Choose the ‘create’ new library buttonAt this point you’ll have an iTunes empty version. No songs listed at all.
  4. Finally, go to File>Library>Import playlist and choose the .xml file I told you before (/Users/username/Music/iTunes/iTunes Music Library.xml ). This way you’ll import all the files except from those having unreachable links to disk (which turns to be exactly what I wanted)

Some useful links i checked before I came up with a solution:

apple suport

programming example (in case your need to do something more complex)


Restore WordPress database on a new server

[this post will be properly edited]

I was creating the new database and WordPress would tell me to install the site.

Solution: dropped the database and created it from ‘mysql’ prompt.

user$ mysql -u root -p’yourpassword’ -h localhost
mysql> create database your_database_name;
mysql> exit
user$ mysql -u root -p’yourpassword’ -h localhost your_database_name

Create a SSL Certificate on Ubuntu

[this post will be properly edited]

sudo a2enmod ssl
sudo service apache2 restart
sudo mkdir /etc/apache2/ssl
sudo nano /etc/apache2/sites-available/default

ServerName example.com:443

SSLEngine on
SSLCertificateFile /etc/apache2/ssl/apache.crt
SSLCertificateKeyFile /etc/apache2/ssl/apache.key

sudo a2ensite default
sudo service apache2 reload

source: digitalocean

How To Set Up Apache Virtual Hosts on Ubuntu

[this post will be properly edited]


sudo mkdir -p /var/www/example.com/public_html
sudo chown -R $USER:$USER /var/www/example.com/public_html
sudo chmod -R 755 /var/www
sudo cp /etc/apache2/sites-available/default /etc/apache2/sites-available/example.com
sudo nano /etc/apache2/sites-available/example.com
ServerName example.com
ServerAlias www.example.com
DocumentRoot /var/www/example.com/public_html
sudo a2ensite example.com
sudo service apache2 restart

How To Install Linux, Apache, MySQL, PHP (LAMP) stack on Ubuntu

[this post will be properly edited]


sudo apt-get update
sudo apt-get install apache2
sudo apt-get install mysql-server libapache2-mod-auth-mysql php5-mysql
sudo mysql_install_db
sudo /usr/bin/mysql_secure_installation # you can just say yes to all options
sudo apt-get install php5 libapache2-mod-php5 php5-mcrypt
sudo nano /etc/apache2/mods-enabled/dir.conf # Add index.php to the beginning of index files
sudo service apache2 restart

Basic server setup on Ubuntu

[this section will be properly edited]


ssh root@ip_address
passwd # changing initial password
adduser demo # adding 'demo' user
visudo
demo ALL=(ALL:ALL) ALL # find section called user privilege specification and add this

Optional (changing ssh port for more security)


nano /etc/ssh/sshd_config

Port 25000
Protocol 2
PermitRootLogin no

UseDNS no
AllowUsers demo

reload ssh

Permalinks on WordPress (amazon EC2)

Motivation: in my particular case I moved a WordPress site from Bluehost to amazon’s EC2. Permalinks were not working.
Solution: I had to modify the override option from my httpd service.

  1. Go to /etc/httpd/conf and edit httpd.conf
    1
    2
    3
    4
    
    <Directory />
        Options FollowSymLinks
        AllowOverride All
    </Directory>
    <Directory />
        Options FollowSymLinks
        AllowOverride All
    </Directory>
  2. Change also AllowOverride if it is set to None.
    1
    2
    3
    4
    5
    
    # AllowOverride controls what directives may be placed in .htaccess files.
    # It can be "All", "None", or any combination of the keywords:
    #   Options FileInfo AuthConfig Limit
    #
        AllowOverride All
    # AllowOverride controls what directives may be placed in .htaccess files.
    # It can be "All", "None", or any combination of the keywords:
    #   Options FileInfo AuthConfig Limit
    #
        AllowOverride All
  3. I you haven’t created it yet, place in the root directory of your wordpress installation a .htaccess file with the following contents:
    1
    2
    3
    4
    5
    6
    7
    8
    9
    10
    11
    
    # BEGIN WordPress
    <IfModule mod_rewrite.c>
    RewriteEngine On
    RewriteBase /
    RewriteRule ^index\.php$ - [L]
    RewriteCond %{REQUEST_FILENAME} !-f
    RewriteCond %{REQUEST_FILENAME} !-d
    RewriteRule . /index.php [L]
    </IfModule>
     
    # END WordPress
    # BEGIN WordPress
    <IfModule mod_rewrite.c>
    RewriteEngine On
    RewriteBase /
    RewriteRule ^index\.php$ - [L]
    RewriteCond %{REQUEST_FILENAME} !-f
    RewriteCond %{REQUEST_FILENAME} !-d
    RewriteRule . /index.php [L]
    </IfModule>
    
    # END WordPress

Source: this post.

SSH Public Key Based Authentication

Motivation: I want to acces to my Bluehost server from my local computer, make some file copies ‘scp’ but from a script executed by Crontab, so I don’t want to introduce my password manually.
Solution:

  • Generate the key from your local machine (I don’t think it’s needed but, store the keys in ~/.ssh

    1
    
    ssh-keygen -t rsa
    ssh-keygen -t rsa
  • Copy the public key to your server:

    1
    
    scp .ssh/id_rsa.pub username@server_name_address:.ssh/authorized_keys2
    scp .ssh/id_rsa.pub username@server_name_address:.ssh/authorized_keys2

Source: ciberciti

remove_filter function in WordPress

Motivation: In a specific website I am using the simplex theme. If one tries to place a static page as home instead of the blog, simplex keeps showing the Home page.
Solution: as you can see, people have already reported this. But in the current version of the theme the line is introduced in functions.php and functions are not really overridden, they can be just replaced.
In the codex it is described how to remove actions and filters but it turned out that the solution didn’t work for me. As usually, it was really easy but cost me a bit to figure out:

1
2
3
4
5
6
function unhook_simplex_function() {
    if(has_filter( 'wp_nav_menu_items', 'simplex_nav_menu_items' )){
        remove_filter( 'wp_nav_menu_items', 'simplex_nav_menu_items' );
    }
}
add_action('init','unhook_simplex_function');
function unhook_simplex_function() {
    if(has_filter( 'wp_nav_menu_items', 'simplex_nav_menu_items' )){
        remove_filter( 'wp_nav_menu_items', 'simplex_nav_menu_items' );
    }
}
add_action('init','unhook_simplex_function');

Instead of calling the remove_filter function directly in my functions.php I just added an action that calls the function that will remove the filter from the ‘init’.

WordPress in Spanish

Motivation: it’s pretty simple. I just wanted to create a WordPress site in Spanish.
Solution: download the file from the source specified below. Extract the file es_ES.mo and place it in /wp-content/languages/. Finally, change the file wp-config.php in the root directory to point to Spanish language: define ('WPLANG', 'es_ES');
Source: http://es.wordpress.org

Orphan next post arrow in Safari and Chrome

Motivation: in the single post page, the arrow that points to the next post appears one line below the ‘Next’ text in Safari and Chrome browsers.
Solution: I don’t know if this is a ‘good’ way to solve it or if I should report it somewhere, but as a quick fix I’ve edited my child style.css file adding the following:

1
2
3
4
5
6
#nav-single .nav-next {    
    float:right;
}
#nav-single .nav-previous {
    float:left;
}  
#nav-single .nav-next {    
    float:right;
}
#nav-single .nav-previous {
    float:left;
}  

VIM tab configuration

Motivation: I like to edit files using VIM. In my server (Bluehost) the default configuration makes my ‘tab’ to produce really width spaces and I want it to be the size of 4 spaces.
Solution: I edited a file .vimrc and I placed in my home directory in my server. The content of this file is the following:

1
2
3
4
5
set expandtab
set smartindent
set tabstop=4
set softtabstop=4
set shiftwidth=4
set expandtab
set smartindent
set tabstop=4
set softtabstop=4
set shiftwidth=4

Password Protect a Directory with .htaccess

Motivation: protect some directories from being accessed without authorisation.
Solution: using the .httaccess file. You just have to configure one and place it into the directory you want to protect. The code inside the file would look something like this:

1
2
3
4
AuthType Basic
AuthName "guest"
AuthUserFile "/home/user/.htpasswds/public_html/directory2storepass/passwd"
require valid-user
AuthType Basic
AuthName "guest"
AuthUserFile "/home/user/.htpasswds/public_html/directory2storepass/passwd"
require valid-user

Then you have to place the password in the directory you have chosen.
The source I’ve used.

wp-cv plugin creation

Motivation: I hate standard text-based CVs. They are so boring and I want something that gives you a quick look into the main things somebody has done. And I also want it to be strongly ‘time-based’. Plus: I want a very very simple design and I need to have a functional version very very soon.
Motivation(II): I want to play a little bit with HTML5, the Canvas and making a WP plugin.
Disclaimer: As I need it to be done immediately because I want to apply for a specific candidature I will be doing stuff without thinking very much on code prettiness. Anyway, I’ll promise it will be an iterative process to I’ll be improving it.
Solution:

  1. Starting point: googling about I found this post. So I must say thanks to Simon Harris, I’ll start based my work on his example.
  2. Changed mouse cursor in mouse EventListeners. I want to have the ‘dragging’, ‘mouseover’ etc. pointers. Example:
    1
    2
    3
    4
    5
    
    if (activities[i].contains(mx, my)) {
        e.target.style.cursor = 'pointer'; // My mouse cursor is in the area of an activity, so I change cursor to 'pointer' style.
        return;
    }
    else e.target.style.cursor = 'auto';
    if (activities[i].contains(mx, my)) {
        e.target.style.cursor = 'pointer'; // My mouse cursor is in the area of an activity, so I change cursor to 'pointer' style.
        return;
    }
    else e.target.style.cursor = 'auto';
  3. For the ‘more information’ area, I want to be able to offer rich text edition. I found this one, Aloha Editor, which I’m going to try.
      Cancelled this step right now. I’ve tried the editor but format was not appearing as I desired and right now I’m not going to spend time on it. Let’s assume we’ll edit information manually adding html format
  4. Once I click on an activity I want to update the ‘More information’ section. I do this using Prototype. Very easy to install (by only including the .js file: <script type="text/javascript" src="js/prototype.js"></script>

    ) and very easy to use (in the activities.js file do something like this

    document.getElementById("information").update("<i>"+MORE_INFO_MSG+"</i>");

    NOTE: I finally chose jQuery because I want to use jQuery sliders as some browsers don’t support “range” input sliders in HTML5 yet. Using Prototype and jQuery leads to some conflicts (which can be solved) but I prefer not to mix them. Usage now would be:

    $("#information").html("<i>"+MORE_INFO_MSG+"</i>");
  5. I want my Activity elements to move across the screen so I will display a slider and I’ll apply a SCREEN_OFFSSET to the X position of my activities. This will do the trick.

Right now I publish it as it is, very ad-hoc. But I had a deadline where I wanted to show it. In fact there is much more ‘automatized’ than what you can see (for example, scrolling in horizontal direction). But I promise I’ll keep working on it and finally integrate it as a WordPress plugin.

Some stuff written in catalan, just a TODO list to myself…
a fer:
– en un futur desplaçar només en horitzontal seleccionant qualsevol punt de sa pantalla (mostrar maneta de drag)
– fer zoom de tots a l’hora
– posar els més antics baix i construir cap amunt (activitats posteriors tenen bases o fonaments amb coses d’abans)
– en un futur posar totes les activitats en transparent menys la seleccionada (hi ha un ctx.globalAlpha, però no mola perquè ho posa tot)
– afegir scrolling de nou

WP-reCAPTCHA: javascript error in pages without submit button

[UPDATE]: it seems that the problemis solved since version 3.1.5 (but I’m not certain if this is version 3.1.5 or since 3.1.6. Anyway, you don’t need to read this post if you are using one of those versions or above.

Motivation: I’m using the WP-reCAPTCHA plugin and there is a javascript error in every page where I didn’t include any post comment box.
Solution: Found here. But I’m copying the solution here anyway:
“In the recaptcha.php page, there’s a function called “save_comment_script”. In the middle of it is a block of code that currently looks like this”

<script type="text/javascript">
var sub = document.getElementById('submit');
document.getElementById('recaptcha-submit-btn-area').appendChild (sub);
document.getElementById('submit').tabIndex = 6;
if ( typeof _recaptcha_wordpress_savedcomment != 'undefined') {
	document.getElementById('comment').value = _recaptcha_wordpress_savedcomment;
}
document.getElementById('recaptcha_table').style.direction = 'ltr';
</script>

Change that code to look like this:

<script type="text/javascript">
if(document.getElementById('submit') != null)
{
	var sub = document.getElementById('submit');
	document.getElementById('recaptcha-submit-btn-area').appendChild (sub);
	document.getElementById('submit').tabIndex = 6;
	if ( typeof _recaptcha_wordpress_savedcomment != 'undefined') {
		document.getElementById('comment').value = _recaptcha_wordpress_savedcomment;
	}
	document.getElementById('recaptcha_table').style.direction = 'ltr';
}
</script>

CoRD – Remote Desktop Protocol

Motivation: I need to connect to from my Mac to a remote desktop which is running a Windows server. I want a tool to be able to do this connection by using RDP (Remote Desktop Protocol).
Solution: I found this software, CoRD, which works better than the Microsoft Remote Desktop Connection for Mac (haven’t tried any others).
Issues: I cannot use the local key ‘Alt’, I still have to figure it out!
[SOLVED]: How silly am I?! Everything works so smooth… What happened is that I’m so used to press on my left ‘Alt’ key (this one doesn’t work once you’re in Windows) but the equivalent in the right hand side words perfectly.

Code Snippet

Note: this post is deprecated, I moved to another plugin, see this new post.

Motivation: I want to publish code into my posts. I’m not really motivated to search or code anything so I’ll go for a plugin this time.

Solution: I found this plugin called “WordPress Code Snippet” which for me it’s okay. Maybe in the future I’ll search for another solution but right now it does the trick.

Two blogs in the same page

Motivation: I want to show 2 blogs in my WordPress site. A quick search on the web reveals that apparently you must install each blog separately, but I don’t want to do so. In fact I don’t need two different blogs, I just want to split posts in two different pages (by category).

Solution: the solution I found consists of using the original posts site for one of the blogs and an extra page (with a specific template) to show the other blog pots. Separation is done by category applied to each post.

  1. Create a Page of Posts template. I’m using a child theme of Twenty Eleven so I just create a pageofposts.phpfile with the code below. Then change the category you want to filter for this blog (blog2).
     
    1
    2
    3
    4
    5
    6
    7
    8
    9
    10
    11
    12
    13
    14
    15
    16
    17
    18
    19
    20
    21
    22
    23
    24
    25
    26
    27
    28
    29
    30
    31
    32
    33
    34
    35
    36
    37
    38
    39
    40
    41
    42
    43
    44
    45
    46
    47
    48
    
    <?php
    /*
    Template Name: Page Of Posts
    */
     
    // if you are not using this in a child of Twenty Eleven, you need to replicate the html structure of your own theme.
     
    get_header(); ?>
    <div id="primary">
    <div id="content" role="main">
     
    <?php
    $paged = (get_query_var('paged')) ? get_query_var('paged') : 1;
    $args= array(
        'category_name' => 'antiquarianism, championship', // Change these category SLUGS to suit your use.
        'paged' => $paged
    );
    query_posts($args);
    if( have_posts() ) :?>
     
    <?php twentyeleven_content_nav( 'nav-above' );?>
     
    <?php while ( have_posts() ) : the_post(); ?>
     
    <?php get_template_part( 'content', get_post_format() ); ?>
     
    <?php endwhile; ?>
     
    <?php twentyeleven_content_nav( 'nav-below' ); ?>
     
    <?php else : ?>
    <article id="post-0" class="post no-results not-found">
    <header class="entry-header">
    <h1 class="entry-title"><?php _e( 'Nothing Found', 'twentyeleven' ); ?></h1>
    </header><!-- .entry-header -->
     
    <div class="entry-content">
    <p><?php _e( 'Apologies, but no results were found for the requested archive. Perhaps searching will help find a related post.', 'twentyeleven' ); ?></p>
    <?php get_search_form(); ?>
    </div>
    </article>
     
    <?php endif; ?>
     
    </div>
    </div>
     
    <?php get_footer();
    <?php
    /*
    Template Name: Page Of Posts
    */
    
    // if you are not using this in a child of Twenty Eleven, you need to replicate the html structure of your own theme.
    
    get_header(); ?>
    <div id="primary">
    <div id="content" role="main">
    
    <?php
    $paged = (get_query_var('paged')) ? get_query_var('paged') : 1;
    $args= array(
    	'category_name' => 'antiquarianism, championship', // Change these category SLUGS to suit your use.
    	'paged' => $paged
    );
    query_posts($args);
    if( have_posts() ) :?>
    
    <?php twentyeleven_content_nav( 'nav-above' );?>
    
    <?php while ( have_posts() ) : the_post(); ?>
    
    <?php get_template_part( 'content', get_post_format() ); ?>
    
    <?php endwhile; ?>
    
    <?php twentyeleven_content_nav( 'nav-below' ); ?>
    
    <?php else : ?>
    <article id="post-0" class="post no-results not-found">
    <header class="entry-header">
    <h1 class="entry-title"><?php _e( 'Nothing Found', 'twentyeleven' ); ?></h1>
    </header><!-- .entry-header -->
    
    <div class="entry-content">
    <p><?php _e( 'Apologies, but no results were found for the requested archive. Perhaps searching will help find a related post.', 'twentyeleven' ); ?></p>
    <?php get_search_form(); ?>
    </div>
    </article>
    
    <?php endif; ?>
    
    </div>
    </div>
    
    <?php get_footer();

    UPDATE: I finally just filtered it in the index.php file. I'm keeping the code above just in case you want to go for that approach, but what I have really done is to copy the idex.php into my child theme. As the post pages is the home, I have added the following code that omits all the posts from programming category:

    1
    2
    3
    4
    5
    6
    7
    8
    9
    
    <?php
        $paged = (get_query_var('paged')) ? get_query_var('paged') : 1;
        $id_cat_prog = get_cat_ID('programming');
        $args= array(
            'cat' => '-'.$id_cat_prog, 
            'paged' => $paged
        ); 
        query_posts($args);
    ?>
    <?php
        $paged = (get_query_var('paged')) ? get_query_var('paged') : 1;
        $id_cat_prog = get_cat_ID('programming');
        $args= array(
            'cat' => '-'.$id_cat_prog, 
            'paged' => $paged
        ); 
        query_posts($args);
    ?>
  2.  
  3. Getting category id. You can just check it from your configuration, but I want to obtain my category id from a category name, so I'm using the function:
     
    1
    
    <?php get_cat_ID( $cat_name ) ?>
    <?php get_cat_ID( $cat_name ) ?>
  4.  
  5. Excluding posts from blog 2 to appear into my feed. I don't want my feed to be updated with posts I place in blog 2. Here I found a list of different WordPress feeds so in my feed address I can filter excluding the category of my second blog posts. By the way, in my case I placed a RSS icon in the menu bar so I manually added the post filter from WP Dashbord (Appearance --> Menus, and edit link from custom option.
     
  6. Once you are in the post view if you click on the 'next' or 'previous' post button by default all the posts (doesn't matter to which category they belong) will appear. But I want only posts of 'my current blog' to appear. To solve this I'm using the next_post_link function to tell that I want to filter next or previous posts by category. You only have to edit a few lines in single.php. Here you have an example:
     
    1
    2
    3
    4
    5
    6
    7
    8
    9
    10
    11
    12
    13
    14
    
    <?php
    $cat_prog = get_cat_ID('programming');
    $cat_pers = get_cat_ID('personal');
    $cat_wp = get_cat_ID('wordpress');
    $cat_bh = get_cat_ID('bluehost');
    if (in_category($cat_prog)) {
        $cat_filter = $cat_pers;
    }
    elseif (in_category($cat_pers)){
        $cat_filter = $cat_prog.','.$cat_wp.','.$cat_bh;
    } 
    ?>      
    <span class="nav-previous"><?php previous_post_link( '%link', __( '<span class="meta-nav">←</span> Previous', 'twentyeleven' ),FALSE,$cat_filter); ?></span>
    <span class="nav-next"><?php next_post_link( '%link', __( 'Next <span class="meta-nav">→</span>', 'twentyeleven' ),FALSE,$cat_filter ); ?></span>
    <?php
    $cat_prog = get_cat_ID('programming');
    $cat_pers = get_cat_ID('personal');
    $cat_wp = get_cat_ID('wordpress');
    $cat_bh = get_cat_ID('bluehost');
    if (in_category($cat_prog)) {
        $cat_filter = $cat_pers;
    }
    elseif (in_category($cat_pers)){
        $cat_filter = $cat_prog.','.$cat_wp.','.$cat_bh;
    } 
    ?>      
    <span class="nav-previous"><?php previous_post_link( '%link', __( '<span class="meta-nav">←</span> Previous', 'twentyeleven' ),FALSE,$cat_filter); ?></span>
    <span class="nav-next"><?php next_post_link( '%link', __( 'Next <span class="meta-nav">→</span>', 'twentyeleven' ),FALSE,$cat_filter ); ?></span>
  7.  
  8. I want to show a different Archives Page for each blog. In one of them I want to show posts by Year and Month. I used the Collapsing Archives plugin. Of course, I don't want posts from the second blog to be listed here. In order to configure the posts I will show in Archives and their style I created an archives.php file in my child theme. Then you only have to create a new page and apply the new template. Be careful: this plugin also takes into account the 'tags' of the post in order to do the filtering, it treats those tags as if they where post categories. Thus you'll have to exclude them in the options:
     
    1
    2
    3
    4
    5
    6
    7
    8
    9
    10
    11
    12
    13
    14
    15
    16
    17
    18
    19
    20
    21
    22
    
    <?php
    /*
    Template Name: Archives
    */
    get_header(); ?>
     
    <div id="container">
    <div id="content" role="main">
    <?php the_post(); ?>
    <h1 class="entry-title"><?php the_title(); ?></h1>
    <h2>Archives by Year & Month</h2>
    <?php
    if( function_exists('collapsArch') ) {
      collapsArch('animate=1&inExcludeCat=exclude&inExcludeCats=programming,wordpress,bluehost,code,snippet,widget'); // in my case 'code','snippet' and 'widget' are tags and not categories
    } else {
        wp_get_archives();
    }
    ?>
    </div><!-- #content -->
    </div><!-- #container -->
    <?php get_sidebar(); ?>
    <?php get_footer(); ?>
    <?php
    /*
    Template Name: Archives
    */
    get_header(); ?>
    
    <div id="container">
    <div id="content" role="main">
    <?php the_post(); ?>
    <h1 class="entry-title"><?php the_title(); ?></h1>
    <h2>Archives by Year & Month</h2>
    <?php
    if( function_exists('collapsArch') ) {
      collapsArch('animate=1&inExcludeCat=exclude&inExcludeCats=programming,wordpress,bluehost,code,snippet,widget'); // in my case 'code','snippet' and 'widget' are tags and not categories
    } else {
        wp_get_archives();
    }
    ?>
    </div><!-- #content -->
    </div><!-- #container -->
    <?php get_sidebar(); ?>
    <?php get_footer(); ?>
     
  9. Finally I wanted to show my programming posts divided by category. Tried to use Collapsing Categories plugin but it won't expand properly. I posted on WordPress forum and I'm currently waiting for any hints on this.And just as a mental note if I finally solve this point: by using this plugin I found another error which is solved here.